Viral TikTok Baked Oats Easy and Delicious Recipe

Looking for a breakfast that’s as easy as it is delicious? You’ve come to the right place! In this article, I’ll show you how to make the viral TikTok baked oats that everyone is raving about. With simple ingredients like oats, banana, and a bit of sweetness, this dish is not only tasty but also packed with nutrients. Let’s dive into this fun recipe and get you enjoying a warm bowl in no time!
Why I Love This Recipe
- Healthy and Satisfying: This recipe combines wholesome ingredients like oats, banana, and nuts, making it a nutritious option for breakfast or a snack.
- Easy to Make: With just a few simple steps and minimal prep time, this baked oats recipe is perfect for busy mornings.
- Customizable: You can easily adjust the ingredients to suit your taste, adding in your favorite fruits, nuts, or sweeteners.
- Deliciously Indulgent: The addition of dark chocolate chips makes this dish feel like a treat, while still being a healthier alternative to traditional desserts.
Ingredients
When making viral TikTok baked oats, you need simple ingredients. Here’s what you need:
- 1 cup rolled oats
- 1 ripe banana, mashed
- 1 tablespoon maple syrup
- 1 teaspoon vanilla extract
- 1 teaspoon baking powder
- 1/2 teaspoon cinnamon
- 1 cup almond milk (or any milk of your choice)
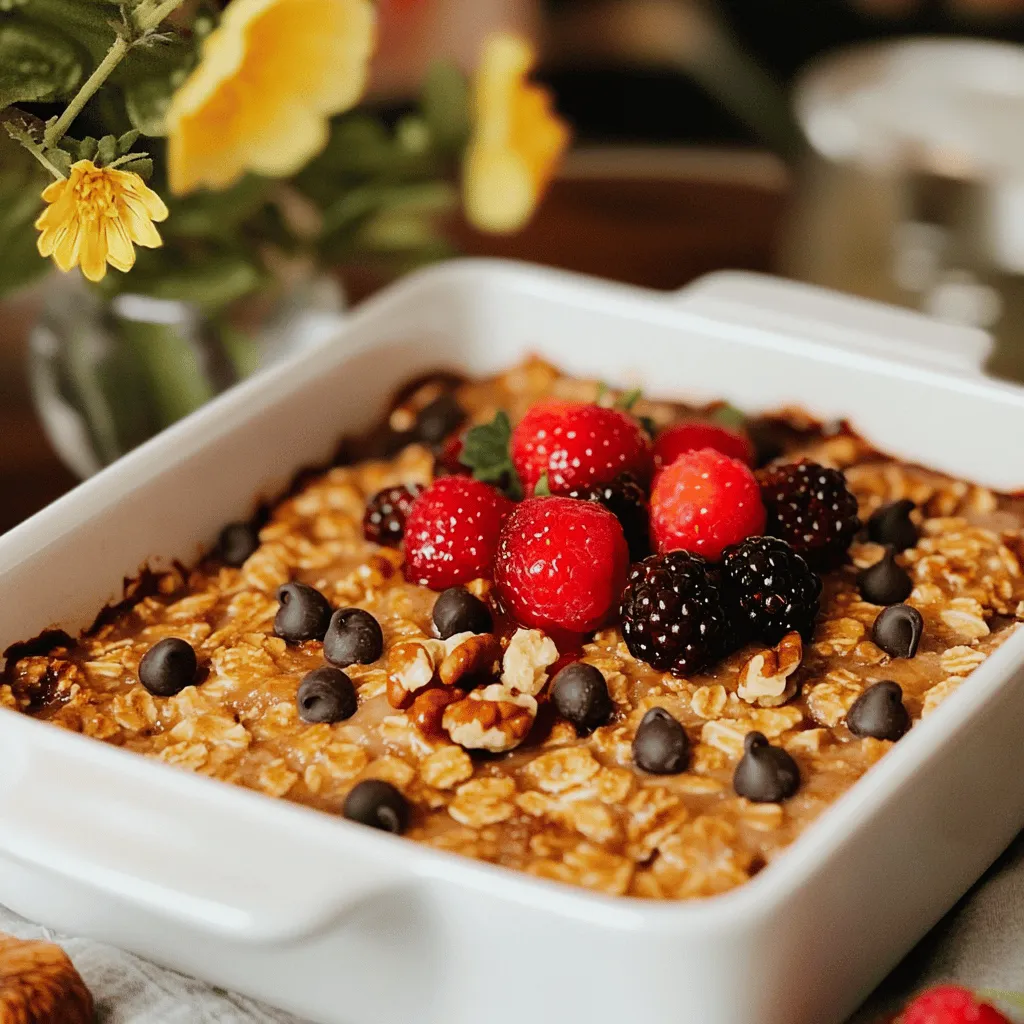
You can add dark chocolate chips and chopped walnuts for extra flavor. These are optional but tasty. Fresh berries make a great topping too. They add color and freshness to your dish.
This recipe is easy and fun to make.

Step-by-Step Instructions
Preparation Steps
1. Preheat oven and prepare baking dish: Start by preheating your oven to 350°F (175°C). Grab an 8×8 inch baking dish and lightly grease it with cooking spray or oil. This helps the baked oats come out easily.
2. Detailed mixing instructions for ingredients: In a large mixing bowl, combine the rolled oats, mashed banana, maple syrup, vanilla extract, baking powder, cinnamon, and almond milk. Mix everything together until smooth. Make sure there are no lumps.
3. Pouring and spreading the mixture into the dish: Once mixed, pour the oat mixture into your prepared baking dish. Use a spatula to spread it evenly. This ensures even baking and a nice texture.
Baking Process
- Recommended baking time and temperature: Place the baking dish in the preheated oven. Bake for about 25-30 minutes. You want the top to be golden brown and firm.
- How to check for doneness: To check if it’s done, insert a toothpick into the center. If it comes out clean, your baked oats are ready! If not, give them a few more minutes.
Serving Suggestions
- How to slice and serve baked oats: After baking, let your dish cool for about 5 minutes. Use a knife to slice it into squares. Serve warm for the best taste.
- Topping ideas for enhanced flavor: You can top your baked oats with fresh berries and a drizzle of maple syrup. Other great options include yogurt, nuts, or even a sprinkle of cinnamon for extra flavor. Enjoy your delicious creation!
Pro Tips
- Use Ripe Bananas: The riper the banana, the sweeter and more flavorful your baked oats will be. Look for bananas with plenty of brown spots for the best results.
- Experiment with Milk: While almond milk is a great option, feel free to use any milk you prefer, such as oat milk, soy milk, or even dairy milk for a creamier texture.
- Mix-Ins Galore: Customize your baked oats by adding other mix-ins like nuts, seeds, or dried fruit. Just be mindful of the total volume to maintain the texture.
- Perfect Serving Size: Cut your baked oats into squares and serve them warm. They are also great for meal prep and can be stored in the fridge for a quick breakfast throughout the week.
Tips & Tricks
Common Mistakes to Avoid
- Overmixing the batter: This can make your baked oats dense. Mix just until combined.
- Not greasing the baking dish properly: A well-greased dish helps the oats release easily. Use cooking spray or oil.
Substitutions and Enhancements
- Dairy-free alternatives using different milk: Almond milk works great, but you can also use oat or soy milk. Each adds its own flavor.
- Alternative sweeteners and their effects: You can swap maple syrup for honey or agave. Each sweetener will change the taste a bit.
Storage and Reheating Tips
- How to store leftovers properly: Let the baked oats cool, then place them in an airtight container. They can last in the fridge for up to four days.
- Reheating options for best taste: Warm them in the microwave for about 30 seconds. You can add a splash of milk to keep them moist.

Variations
Flavor Combinations
You can mix flavors to make baked oats extra tasty. Adding fruits like blueberries or apples brightens the dish. They add sweetness and nutrition. You can also try flavoring with nut butters or spices. A spoon of almond butter gives a nutty taste. A dash of cinnamon or nutmeg warms up the flavor. These small changes can make a big difference.
Health-Conscious Adaptations
If you’re watching your sugar, you can reduce it easily. Using unsweetened applesauce instead of maple syrup lowers sugar. It keeps the oats moist and sweet. For those who need gluten-free options, use certified oats. They taste great and fit many diets. This way, everyone can enjoy baked oats without worry.
Seasonal Twists
Seasonal ingredients can change the vibe of your baked oats. In autumn, try pumpkin spice. It gives a cozy flavor perfect for cooler days. In summer, use fresh, seasonal fruits like peaches or strawberries. They add vibrancy and freshness. These twists keep your breakfast exciting all year round.
Popularity and Trends
Origin of Baked Oats Trend
The baked oats trend started on TikTok. People began sharing their tasty creations. It became a fun challenge to make baked oats in unique ways. Some TikTokers who helped this trend grow include @fitwaffle and @bakingwithjosh. Their videos showed easy steps and fun flavors. They inspired many to try this dish at home.
Why Baked Oats are Trending
Baked oats are a hit because they are both good for you and tasty. They have fiber from oats, which helps with digestion. They also provide energy for the day. You can make them in many ways. You can add fruits, nuts, or even chocolate. This makes them perfect for meal prep. You can bake a batch at the start of the week and enjoy them all week long.
Community Response
Users love sharing their baked oats on social media. They post photos and ideas for new flavors. Some use peanut butter, while others try berries. Many say baked oats are their new favorite breakfast. They rank high among other easy breakfast options. The community keeps the trend alive with creativity and fun.
FAQs
How long do baked oats last?
Baked oats can last for about five days in the fridge. Store them in an airtight container to keep them fresh. If you want them to last longer, you can freeze them. They will stay good in the freezer for up to three months. Just make sure to wrap them well to avoid freezer burn.
Can I make baked oats without bananas?
Yes, you can! If you do not have bananas, you can use applesauce or yogurt. These ingredients help to keep the oats moist and add flavor. You can also try using a flaxseed egg. Mix one tablespoon of flaxseed meal with three tablespoons of water. Let it sit for a few minutes until it thickens up.
Is baked oats healthy?
Baked oats are quite healthy! They are full of whole grains, which give you energy. They also have fiber that helps with digestion. If you add fruits or nuts, you boost the vitamins and minerals. This makes baked oats a great choice for breakfast or a snack.
Baked oats are delicious and easy to make. We covered the simple ingredients, preparation, and baking steps. You learned about tips to avoid common mistakes and how to store leftovers. We explored flavor variations and the baked oats trend on TikTok. This dish offers health benefits and endless versatility. Try it with your favorite toppings or adjustments. Enjoy a warm and tasty breakfast that fits into your lifestyle effortlessly. Baked oats will become a staple you love.

Viral TikTok Baked Oats
Ingredients
1 cup rolled oats
1 ripe banana, mashed
1 tablespoon maple syrup
1 teaspoon vanilla extract
1 teaspoon baking powder
1/2 teaspoon cinnamon
1 cup almond milk (or any milk of your choice)
1/4 cup dark chocolate chips
1/4 cup chopped walnuts (optional)
Fresh berries for topping (optional)
Instructions
Preheat your oven to 350°F (175°C) and prepare a small baking dish (8×8 inch or similar) by greasing it lightly with cooking spray or oil.
In a large mixing bowl, combine the rolled oats, mashed banana, maple syrup, vanilla extract, baking powder, cinnamon, and almond milk. Stir until well combined and the mixture is smooth.
Fold in the dark chocolate chips and chopped walnuts, ensuring they’re evenly distributed throughout the batter.
Pour the oat mixture into the prepared baking dish, spreading it out evenly.
Bake in the preheated oven for 25-30 minutes, or until the top is golden and a toothpick inserted comes out clean.
Once done, remove from the oven and let it cool for a few minutes before slicing into squares.
Serve warm, topped with fresh berries and a drizzle of additional maple syrup if desired.
Prep Time: 10 minutes | Total Time: 40 minutes | Servings: 4

Viral TikTok Baked Oats
Ingredients
- 1 cup rolled oats
- 1 ripe banana mashed
- 1 tablespoon maple syrup
- 1 teaspoon vanilla extract
- 1 teaspoon baking powder
- 0.5 teaspoon cinnamon
- 1 cup almond milk (or any milk of your choice)
- 0.25 cup dark chocolate chips
- 0.25 cup chopped walnuts (optional)
- to taste Fresh berries for topping (optional)
Instructions
- Preheat your oven to 350°F (175°C) and prepare a small baking dish (8x8 inch or similar) by greasing it lightly with cooking spray or oil.
- In a large mixing bowl, combine the rolled oats, mashed banana, maple syrup, vanilla extract, baking powder, cinnamon, and almond milk. Stir until well combined and the mixture is smooth.
- Fold in the dark chocolate chips and chopped walnuts, ensuring they're evenly distributed throughout the batter.
- Pour the oat mixture into the prepared baking dish, spreading it out evenly.
- Bake in the preheated oven for 25-30 minutes, or until the top is golden and a toothpick inserted comes out clean.
- Once done, remove from the oven and let it cool for a few minutes before slicing into squares.
- Serve warm, topped with fresh berries and a drizzle of additional maple syrup if desired.

![- 1 cup all-purpose flour (heat-treated) - 1/4 cup granulated sugar - 1/4 cup brown sugar, packed - 1/2 cup unsalted butter, melted - 1/4 teaspoon salt - 1 teaspoon vanilla extract - 1/2 cup rainbow sprinkles - 1/2 cup mini chocolate chips (optional) - 1 cup vanilla frosting Heat-treating flour is key for safety. Raw flour can have germs. To heat-treat, spread the flour on a baking sheet. Bake it at 350°F (175°C) for five minutes. This step kills any harmful bacteria, making it safe to eat without baking. If you want a gluten-free option, you can use a gluten-free flour blend. Look for one that is designed for baking. This makes it easy for everyone to enjoy these tasty bars. Feel free to mix it up with different sprinkles. You can use chocolate sprinkles, or even themed sprinkles for events. For frosting, try chocolate or cream cheese frosting instead. Each will give a new twist to the bars. You can always experiment to find your favorite combination! 1. Mixing the dry ingredients Start with a large mixing bowl. Add 1 cup of heat-treated flour, 1/4 cup of granulated sugar, 1/4 cup of brown sugar, and 1/4 teaspoon of salt. Use a whisk to blend them well. This mix forms the base of your bars. 2. Combining wet ingredients Next, pour in 1/2 cup of melted unsalted butter and 1 teaspoon of vanilla extract. Stir until everything combines into a dough. This part brings the sweetness and rich flavor to the bars. 1. Pressing mixture into the pan Line an 8x8-inch square baking pan with parchment paper. Leave some paper hanging over the edges. This makes it easy to lift the bars later. Press the dough evenly into the pan. Use a spatula to smooth the top. 2. Spreading the frosting evenly Grab 1 cup of vanilla frosting. Spread it over the pressed mixture. Use your spatula to create a nice, even layer. For fun, sprinkle some extra rainbow sprinkles on top for color and crunch. 1. Refrigeration time and tips for proper setting Place the pan in the fridge for at least 30 minutes. This helps the bars firm up. If you want them extra solid, leave them in longer. Once set, lift the bars out using the parchment paper. Cut into squares and enjoy! For the complete recipe, check out the Full Recipe section. - Overmixing the batter: Mixing too much can make your bars dense. Just mix until combined. - Skipping refrigeration: If you don’t chill the bars, they will stay too soft. Chill for at least 30 minutes. - Reducing sugar for less sweetness: You can cut down the granulated sugar. This will make the bars less sweet without losing flavor. - Adding flavor extracts: Try different extracts like almond or coconut. Just a little can change the taste. - Best mixing bowls and tools: Use a large mixing bowl for easy stirring. A sturdy spatula helps combine the batter well. - Recommended baking pan types: A metal or glass 8x8-inch pan works best. Line it with parchment paper for easy removal. For the full recipe, check out the No-Bake Funfetti Cake Batter Bars. {{image_2}} You can change the flavor of your No-Bake Funfetti Cake Batter Bars easily. Try making chocolate cake batter bars by swapping in chocolate cake mix for the flour. Just mix it in as you would the flour. This gives a rich, chocolatey taste that many love. Another fun twist is using peanut butter. Replace the butter with creamy peanut butter. This adds a nutty flavor that pairs well with sprinkles. You can also mix in mini chocolate chips for extra indulgence. Make your bars pop with seasonal decorations. Use holiday-themed sprinkles for Christmas, Halloween, or birthdays. You can find sprinkles shaped like stars, hearts, or seasonal colors. This makes the bars festive and fun for any occasion. You can also change the color of your sprinkles based on the season. For spring, use pastel colors. For summer, bright colors shine. This small touch makes your bars look special and inviting. Want a vegan version? It’s easy! For dairy-free substitutions, use coconut oil in place of butter. It gives a nice flavor and texture. You can also use plant-based milk for the frosting. For frosting, try a vegan buttercream made with powdered sugar and plant-based butter. This way, you keep the creamy texture without using dairy. These options make your delicious bars suitable for everyone! For the full recipe, check out the [Full Recipe]. To keep your No-Bake Funfetti Cake Batter Bars fresh, store them in the refrigerator. Place the bars in an airtight container. This helps keep them moist and tasty. You can also cover them tightly with plastic wrap. If you want to save them for later, you can freeze them. Cut the bars into squares first. Wrap each piece in plastic wrap and then put them in a freezer bag. They will stay fresh this way! When stored correctly, these bars can last about a week in the fridge. If you freeze them, expect them to stay fresh for up to three months. Always check for any signs of spoilage before eating them. Look for changes in color or smell. You don’t need to reheat these bars, as they are best served cold. If you want a warm treat, you can microwave them for a few seconds. Just be careful not to overheat. A few seconds is all you need to enjoy a soft, tasty treat! No, you should not use regular flour. Raw flour can contain harmful bacteria. Heat-treated flour kills these germs and makes the flour safe for no-bake recipes. You can easily heat-treat flour at home by baking it on a baking sheet. Spread it out and bake at 350°F for about five minutes. Let it cool before using. These bars stay fresh for about five days at room temperature. To keep them longer, store them in the fridge. You know they are spoiled if they smell bad or look dry. Check for any mold as well. If you see any signs of spoilage, toss them out. Yes, you can make these bars ahead of time. They are great for parties and special events. Just prepare them a day or two before. Store them in the fridge until you are ready to serve. To save time, you can also press the mixture into the pan and chill it. Frost just before serving for the best taste. You can easily swap ingredients if needed. If you lack rainbow sprinkles, use chocolate or other types. For the frosting, any flavor works well. Don’t have mini chocolate chips? You can skip them or use nuts instead. Just be creative and adjust the recipe to fit what you have at home. For the full recipe, check the original instructions. This blog post covered the key ingredients, steps, and tips for making delicious dessert bars. We discussed crucial details like heat-treating flour and gluten-free options. I shared variations and ideas for seasonal fun, plus how to store and reheat leftovers. In summary, these bars are easy to make and fun to customize. With simple ingredients and clear steps, you're ready to bake. Enjoy creating your own tasty treats!](https://dailydishlab.com/wp-content/uploads/2025/07/c4f5a401-6c49-4de0-bdd4-db0dcac5f5d0-768x768.webp)


