Zucchini Chickpea Burgers Flavorful and Healthy Meal

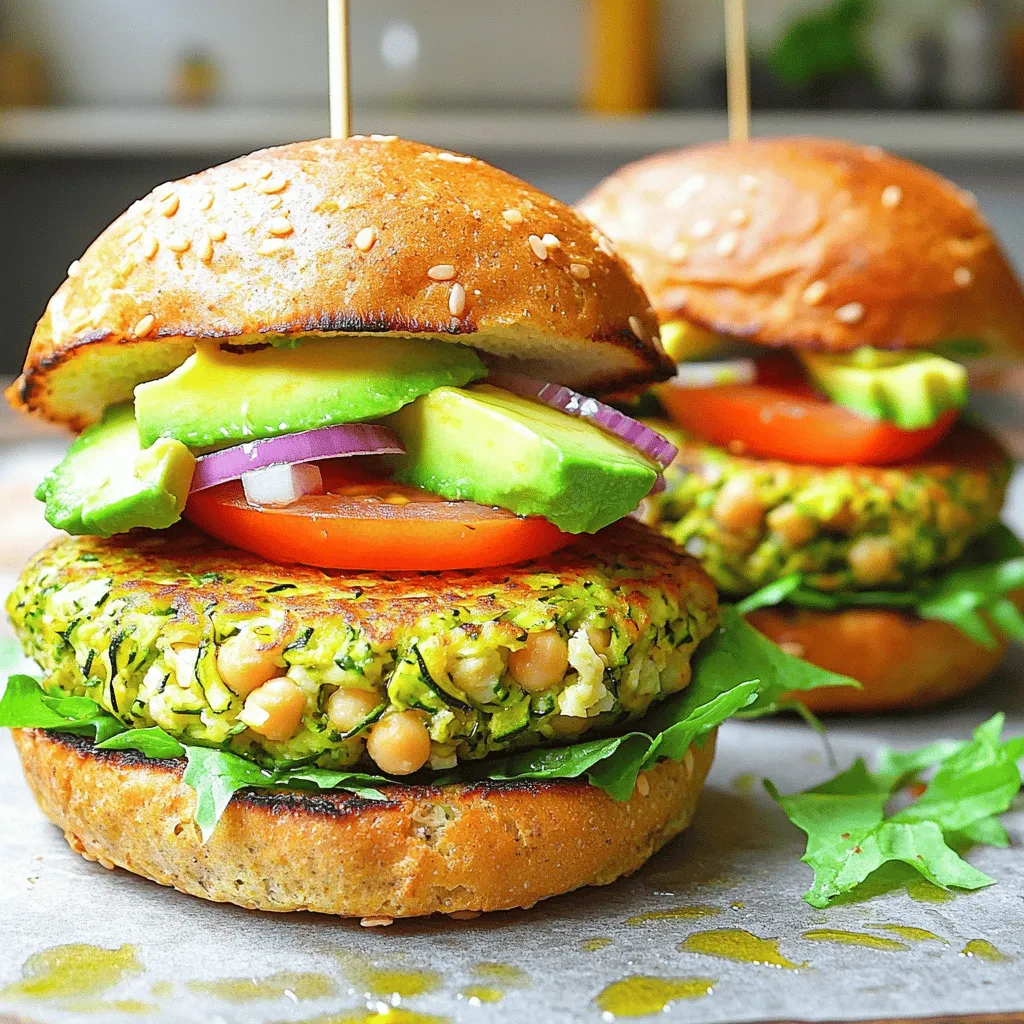
Looking for a tasty, healthy meal? Zucchini Chickpea Burgers check all the boxes! Packed with flavor and nutrition, they are perfect for lunch or dinner. You don’t need fancy ingredients to make this dish. I’ll show you how to whip up these veggie-packed patties in no time. Get ready to impress your taste buds and enjoy a meal that’s good for you! Let’s dive in!
Why I Love This Recipe
- Easy to Make: This recipe comes together in just 30 minutes, making it perfect for a quick weeknight dinner.
- Healthy Ingredients: With zucchini and chickpeas as the base, these burgers are packed with nutrients and fiber.
- Customizable: You can easily switch up the toppings and seasonings to suit your taste preferences.
- Delicious Flavor: The combination of spices like cumin and smoked paprika gives these burgers an irresistible flavor.
Ingredients
Detailed List of Ingredients
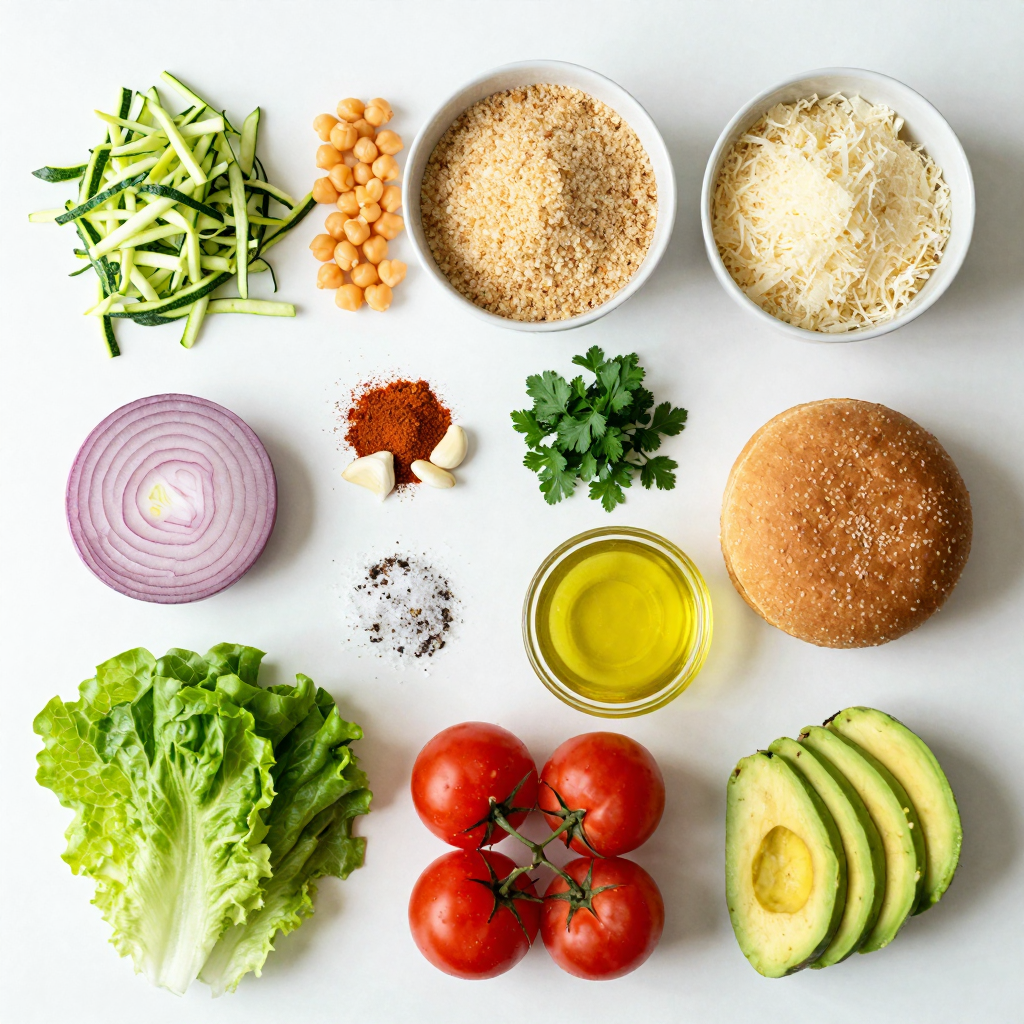
To make Zucchini Chickpea Burgers, gather these simple ingredients:
- 2 medium zucchinis, grated
- 1 can (15 oz) chickpeas, drained and rinsed
- 1/2 cup breadcrumbs (use gluten-free if needed)
- 1/4 cup grated Parmesan cheese (or nutritional yeast for a vegan option)
- 1/4 cup finely chopped red onion
- 2 cloves garlic, minced
- 1 teaspoon ground cumin
- 1 teaspoon smoked paprika
- 1/2 teaspoon salt
- 1/4 teaspoon black pepper
- 1 tablespoon fresh parsley, chopped
- 1 tablespoon olive oil (for frying)
- Burger buns (whole grain or gluten-free)
- Lettuce, tomato, and avocado for toppings
Measurements and Substitutions
When measuring, be precise. If you need a substitute:
- Use oats instead of breadcrumbs for a gluten-free option.
- Swap Parmesan cheese with nutritional yeast for a vegan dish.
- Red onion can be replaced with green onions or shallots.
- If you want less spice, reduce the cumin and smoked paprika.
Nutritional Benefits of Key Ingredients
These burgers are not just tasty; they are full of good stuff:
- Zucchini is low in calories and high in water. It helps keep you full.
- Chickpeas are rich in protein and fiber, making them great for muscle health.
- Garlic boosts your immune system and adds flavor.
- Parsley is packed with vitamins and adds freshness to the dish.
- Olive oil provides healthy fats that are heart-friendly.
This mix of ingredients makes Zucchini Chickpea Burgers a healthy choice for any meal.

Step-by-Step Instructions
Preparation of Zucchini and Chickpeas
Start with the zucchinis. Grate them using a box grater. Then, take a clean kitchen towel and place the grated zucchini inside. Squeeze the towel tightly to remove excess moisture. This step is key to making sure the burgers do not turn out soggy. Next, open the can of chickpeas. Drain and rinse them well. This helps to remove extra salt and preservatives.
Mixing and Shaping the Burger Patties
In a large mixing bowl, mash the drained chickpeas with a fork or potato masher. Leave some chunks for texture. Now, add the squeezed zucchini to the bowl. Next, add breadcrumbs, Parmesan cheese (or nutritional yeast for vegan), chopped red onion, minced garlic, cumin, smoked paprika, salt, pepper, and parsley. Mix everything together until it is well combined. Once it’s mixed, form the mixture into patties. You should get about 6-8 burger-sized rounds, depending on how thick you want them.
Cooking the Zucchini Chickpea Burgers
Heat a skillet over medium heat and add olive oil. Once the oil is hot, place the patties in the skillet. Cook each side for about 4-5 minutes until they turn golden brown and crispy. Keep an eye on them to avoid burning. Once done, place the burgers on whole grain or gluten-free buns. Top them off with your favorite toppings like lettuce, tomato, and avocado. Enjoy your flavorful and healthy meal!
Pro Tips
- Drain the Zucchini: Make sure to squeeze out as much moisture as possible from the grated zucchini to avoid soggy burgers.
- Texture Matters: Leave some chickpeas slightly chunky after mashing to give your burgers a better texture and bite.
- Chill the Patties: For firmer patties, chill the shaped burger mixture in the refrigerator for 30 minutes before cooking.
- Flavor Boost: Add additional spices or herbs such as chili powder or cilantro for an extra flavor kick.
Tips & Tricks
How to Prevent Soggy Burgers
To keep your zucchini chickpea burgers from being soggy, moisture control is key. Start by grating the zucchinis. Then, place them in a clean kitchen towel. Squeeze out as much water as you can. This step makes a big difference.
Another tip is to use breadcrumbs. They soak up extra moisture and help bind the mix. If you want a firmer burger, add more breadcrumbs. Just remember, too many can make them dry.
Ideal Cooking Techniques and Equipment
For cooking, use a skillet over medium heat. This way, you get a nice golden crust. A non-stick skillet works great. If you don’t have one, a bit more oil will help prevent sticking.
Cook the patties for about 4-5 minutes on each side. You want them crispy and brown. If you prefer grilling, ensure your grill is hot. This will help keep the burgers intact.
Serving Suggestions for Zucchini Chickpea Burgers
When it’s time to serve, go for whole grain or gluten-free buns. Top your burgers with fresh lettuce, tomato, and sliced avocado. You can also add a dollop of yogurt or a spicy sauce for extra flavor.
Feel free to pair these burgers with a side salad or sweet potato fries. They make a great meal for lunch or dinner. Want to make it even easier?

Variations
Additional Flavor Enhancements
You can add more flavor to your Zucchini Chickpea Burgers. Try adding spices like cayenne pepper for heat or oregano for a fresh taste. Fresh herbs, like basil or cilantro, make the burgers bright and fragrant. You can also mix in some cheese for creaminess or a touch of mustard for tang. Experiment with these options to find your favorite flavor twist!
Alternative Ingredients for Dietary Preferences
If you need to make changes for dietary needs, it’s easy! For a gluten-free option, use gluten-free breadcrumbs. To make it vegan, swap the Parmesan cheese for nutritional yeast. You can also replace the egg with a flaxseed egg (1 tablespoon ground flaxseed mixed with 2.5 tablespoons water). This keeps the burger together while making it plant-based.
Serving Ideas for Different Occasions
These burgers are great for many occasions. For a casual meal, serve them on whole grain or gluten-free buns with lettuce, tomato, and avocado. For a picnic, pair them with a fresh salad or sweet potato fries. If you want to add a gourmet touch, try serving them on a bed of arugula with a drizzle of balsamic glaze. Each option makes your meal fun and special!
Storage Info
Best Practices for Storing Leftovers
To keep your Zucchini Chickpea Burgers fresh, store them in an airtight container. Let the burgers cool completely before sealing them. This helps prevent moisture buildup, which can make the burgers soggy. Place a piece of parchment paper between layers if you stack them. This simple step keeps them from sticking together.
Reheating Techniques for Optimal Texture
When you are ready to enjoy leftovers, reheating them well is key. Use a skillet over medium heat for the best results. Add a little olive oil to the pan. This helps the burgers regain their crispness. Cook for about 3-4 minutes on each side. You can also reheat them in an oven at 350°F (175°C) for 10-15 minutes. This method also keeps them crispy.
Freezing Tips for Meal Prep
Freezing is a great way to prepare meals ahead of time. To freeze the burgers, shape them into patties and place them on a baking sheet. Freeze them for about 1-2 hours until firm. Once solid, transfer the patties to a freezer bag. Remove as much air as possible. They can last up to three months in the freezer. When ready to cook, you can thaw them overnight in the fridge or cook them straight from frozen. Just add a few extra minutes to the cooking time. Enjoy the convenience of having healthy meals ready to go!
FAQs
How to make Zucchini Chickpea Burgers vegan?
To make Zucchini Chickpea Burgers vegan, simply replace the Parmesan cheese with nutritional yeast. This swap keeps the flavor while removing all animal products. You can also use gluten-free breadcrumbs if needed. The recipe stays just as tasty and satisfying!
Can I grill these burgers instead of frying?
Yes, you can grill these burgers! Grilling adds a nice smoky flavor. Preheat your grill to medium heat. Oil the grill grates to prevent sticking. Cook the patties for about 4-5 minutes on each side. Watch them closely to avoid burning.
What can I serve with Zucchini Chickpea Burgers?
Zucchini Chickpea Burgers pair well with many sides. Consider serving them with a fresh salad, sweet potato fries, or coleslaw. You can also add toppings like lettuce, tomato, and avocado for extra flavor. These choices balance the meal and add color.
How do I know when the burgers are done?
You can tell when the burgers are done by looking for a golden-brown crust. The inside should feel firm, not soft. If you use a thermometer, aim for an internal temperature of 165°F. This ensures they are safe to eat and fully cooked.
In this blog post, we explored how to make zucchini chickpea burgers. We covered the ingredients, steps for preparation, and cooking methods. You learned tips to avoid soggy burgers and variations to suit your tastes. Additionally, we shared best practices for storage and reheating.
These burgers are healthy and versatile. They can fit any meal or occasion. Now, with the right knowledge and some creativity, you can enjoy making these tasty burgers at home. Enjoy your cooking journey!

Zucchini Chickpea Burgers
Ingredients
2 medium zucchinis, grated
1 can (15 oz) chickpeas, drained and rinsed
1/2 cup breadcrumbs (use gluten-free if needed)
1/4 cup grated Parmesan cheese (or nutritional yeast for a vegan option)
1/4 cup finely chopped red onion
2 cloves garlic, minced
1 teaspoon ground cumin
1 teaspoon smoked paprika
1/2 teaspoon salt
1/4 teaspoon black pepper
1 tablespoon fresh parsley, chopped
1 tablespoon olive oil (for frying)
Burger buns (whole grain or gluten-free)
Lettuce, tomato, and avocado for toppings
Instructions
Begin by placing the grated zucchinis in a clean kitchen towel and squeezing out excess moisture. This step is important to prevent the burgers from being soggy.
In a large bowl, mash the drained chickpeas using a fork or potato masher until mostly smooth with some chunks remaining for texture.
Add the squeezed zucchini, breadcrumbs, Parmesan cheese (or nutritional yeast), red onion, minced garlic, cumin, smoked paprika, salt, pepper, and chopped parsley to the chickpeas. Mix everything until well combined.
Shape the mixture into patties, forming about 6-8 burger-sized rounds depending on thickness.
Heat olive oil in a skillet over medium heat. Cook the patties for about 4-5 minutes on each side until golden brown and crispy.
Serve on burger buns with your choice of toppings like lettuce, tomato, and sliced avocado.
Prep Time: 15 minutes | Total Time: 30 minutes | Servings: 4-6

Zucchini Chickpea Burgers
Ingredients
- 2 medium zucchinis, grated
- 1 can (15 oz) chickpeas, drained and rinsed
- 1/2 cup breadcrumbs (use gluten-free if needed)
- 1/4 cup grated Parmesan cheese (or nutritional yeast for a vegan option)
- 1/4 cup finely chopped red onion
- 2 cloves garlic, minced
- 1 teaspoon ground cumin
- 1 teaspoon smoked paprika
- 1/2 teaspoon salt
- 1/4 teaspoon black pepper
- 1 tablespoon fresh parsley, chopped
- 1 tablespoon olive oil (for frying)
- 1 package burger buns (whole grain or gluten-free)
- to taste lettuce, tomato, and avocado for toppings
Instructions
- Begin by placing the grated zucchinis in a clean kitchen towel and squeezing out excess moisture. This step is important to prevent the burgers from being soggy.
- In a large bowl, mash the drained chickpeas using a fork or potato masher until mostly smooth with some chunks remaining for texture.
- Add the squeezed zucchini, breadcrumbs, Parmesan cheese (or nutritional yeast), red onion, minced garlic, cumin, smoked paprika, salt, pepper, and chopped parsley to the chickpeas. Mix everything until well combined.
- Shape the mixture into patties, forming about 6-8 burger-sized rounds depending on thickness.
- Heat olive oil in a skillet over medium heat. Cook the patties for about 4-5 minutes on each side until golden brown and crispy.
- Serve on burger buns with your choice of toppings like lettuce, tomato, and sliced avocado.


![To make the perfect cheesesteak, you need a few key ingredients: - 1 lb ribeye steak, thinly sliced against the grain - 4 slices provolone cheese or Cheez Whiz - 4 fresh hoagie rolls Ribeye steak is great because it has a lot of flavor. Thin slices help it cook fast. Provolone cheese adds a nice, creamy texture. Cheez Whiz gives a fun twist. The hoagie rolls hold all the goodness together. You can make your cheesesteak even better with some optional ingredients: - Bell peppers (red or green) - Sliced jalapeños - Seasonings and spices Bell peppers add sweetness and color. Sliced jalapeños bring heat and spice. You can also add spices like garlic powder and pepper for extra flavor. Feel free to mix and match these ingredients. This way, you can create a cheesesteak that fits your taste! For the full recipe, check out the Ultimate Cheesesteak Sandwich. - Preheat the skillet: Start by heating a large skillet over medium-high heat. Add 2 tablespoons of olive oil. Let it heat until it shimmers. - Season the ribeye steak: Take 1 pound of ribeye steak and slice it thinly against the grain. In a bowl, mix salt, freshly ground pepper, and 1 teaspoon of garlic powder. Coat the beef evenly with this mixture. - Sauté onions and bell peppers: Add 1 large thinly sliced onion and 1 bell pepper to the hot skillet. Cook for 3-4 minutes. Stir until they soften and smell great. - Combine steak with vegetables: Push the veggies to one side of the skillet. Add the seasoned ribeye to the other side. Cook for 5-7 minutes. Stir it now and then until the beef is browned to your liking. - Melt the provolone cheese: Once the steak is cooked, mix it with the veggies. Place 4 slices of provolone cheese on top. Cover the skillet with a lid for 2 minutes to melt the cheese nicely. - Toasting the hoagie rolls: While the cheese melts, toast 4 fresh hoagie rolls in another skillet or toaster. Aim for a golden and crisp finish for added texture. Now you are ready to build your ultimate cheesesteak sandwich! Follow the [Full Recipe] for complete details. To make a great cheesesteak, start with ribeye steak. - How to slice ribeye against the grain: Look at the meat. The grain shows the direction of the fibers. Slice against the grain. This method makes the meat tender and easy to chew. - Choose the right thickness: Aim for slices about 1/8 inch thick. Thinner slices cook fast and soak up flavors. Getting the right flavor makes your cheesesteak special. - Importance of skillet temperature: Preheat your skillet over medium-high heat. A hot skillet sears the steak. This gives a nice crust and locks in juices. - Tips for achieving desired steak doneness: Cook steak for 5-7 minutes. Stir occasionally to avoid burning. Use a meat thermometer if you want to be precise. Aim for 130°F for medium-rare. Pair your cheesesteak with great sides to enhance the meal. - Best side dishes to pair: Crispy fries are classic. A fresh salad adds crunch and brightness. You can also try onion rings for a fun twist. - Quick condiment ideas: Serve with ketchup or hot sauce for extra flavor. Pickles add a nice crunch, too. Sliced jalapeños give a spicy kick. Follow these tips to elevate your ultimate cheesesteak. For detailed steps, check the Full Recipe. {{image_4}} For a classic cheesesteak, use provolone cheese or Cheez Whiz. Both melt well and add rich flavor. However, if you want to elevate your sandwich, try gourmet cheeses like sharp cheddar or creamy gouda. These options give you a unique twist. You can also add truffle oil or sautéed mushrooms for deeper taste. You can enjoy a cheesesteak without meat. Use portobello mushrooms or seitan as a meat substitute. Both add great texture and flavor. For cheese, try plant-based options like cashew cheese or vegan mozzarella. These substitutes melt nicely and taste amazing. The most famous cheesesteaks come from Philadelphia. They focus on thinly sliced ribeye with cheese on a soft roll. However, other regions have their spins. In Chicago, you might see giardiniera added for a spicy kick. In Texas, barbecue sauces give a sweet and smoky flavor. Each style brings its own unique toppings and spices, showcasing local tastes. For more about making your own cheesesteak, check out the Full Recipe. To keep your cheesesteak fresh, follow these steps: - Store leftovers in the fridge. Let them cool first. - Use airtight containers. Glass or plastic containers work well. - Separate layers with parchment paper. This prevents sogginess. Place your leftover cheesesteak in the fridge. It will stay good for 3 to 4 days. If you have extra filling, store it separately from the rolls. This keeps the bread fresh. Reheat your cheesesteak to bring back its flavor. Here’s how: - Use a skillet. Heat it over medium heat. Add a bit of oil. - Place the sandwich in the skillet. Cover it with a lid. This helps the cheese melt. - Heat for 5-7 minutes. Flip halfway to warm both sides. You can also use the microwave, but be careful. It can make the bread chewy. To keep the taste and texture, the skillet is best. Enjoy your delicious ultimate cheesesteak! For the full recipe, check out the complete instructions. The best cut for a cheesesteak is ribeye. Its marbling gives great flavor and tenderness. You can also use sirloin or flank steak, but ribeye is my top choice. Always slice against the grain for the best bite. This makes it easier to chew and helps keep the flavors locked in. You can skip the cheese and still have a tasty sandwich. Try adding toppings like sautéed mushrooms, avocado, or spicy mustard. Use roasted red peppers for a sweet flavor boost. You can also add fresh herbs, like basil or cilantro, for extra freshness. These alternatives keep your sandwich tasty and fun. To find great cheesesteaks, ask locals for their favorites. Check out food blogs or review sites for tips. Look for places that use fresh ingredients and have a good reputation. You can also explore food festivals or markets. These spots often showcase local chefs who make amazing cheesesteaks. Yes, you can freeze cheesesteak sandwiches! Wrap them tightly in plastic wrap or foil. Place them in an airtight container or freezer bag to prevent freezer burn. They can last up to three months in the freezer. When you're ready to eat, thaw in the fridge and reheat in the oven for the best taste. This guide has covered all you need to make the ultimate cheesesteak sandwich. From selecting the right ribeye steak and cheese to perfecting your cooking technique, you’re now equipped to create a tasty meal. Remember to customize your sandwich with your favorite ingredients and remember storage tips for leftovers. Enjoy exploring different styles and variations. Making a great cheesesteak can be fun and rewarding. Now, you can impress friends and family with your delicious creations. Happy cooking!](https://dailydishlab.com/wp-content/uploads/2025/06/698132e8-5117-44f3-910b-a554f39a5b8a-768x768.webp)


![- 4 large russet potatoes - 2 cups broccoli florets, chopped - 1 cup sharp cheddar cheese, grated - 1/2 cup cream cheese, softened - 1/4 cup sour cream - 2 tablespoons butter - 1 garlic clove, minced - Salt and pepper to taste - 1/4 teaspoon paprika (optional) - Green onions, chopped (for garnish) The main ingredients for broccoli cheddar stuffed potatoes are simple and fresh. Russet potatoes are perfect because they are fluffy and hold up well. Broccoli adds a nice crunch and color. Sharp cheddar cheese gives a bold flavor, while cream cheese and sour cream add creaminess. Butter and garlic bring richness and aroma. - Additional toppings (bacon bits, chives) - Alternative cheese options You can play with the toppings. Bacon bits add a savory touch. Chives lend a fresh, onion-like flavor. You may also swap cheese types if you prefer. Try mozzarella or pepper jack for a twist. This recipe is flexible, so feel free to make it your own! 1. Preheat your oven to 425°F (220°C). This helps the potatoes cook evenly. 2. Scrub the russet potatoes under running water. This removes dirt and makes them clean. 3. Pierce each potato several times with a fork. This lets steam escape as they bake. 4. Place the potatoes on a baking sheet. Bake them for 45-60 minutes. They are done when tender. 1. While the potatoes bake, steam the broccoli florets for 3-4 minutes. They should look bright green and tender. 2. Drain the broccoli and set it aside. This keeps it from getting too soggy. 3. In a mixing bowl, combine the steamed broccoli, sharp cheddar cheese, cream cheese, sour cream, butter, and minced garlic. 4. Stir everything together until it’s well mixed and coated. Add salt and pepper to taste. This mixture is the heart of the dish. 1. When the potatoes are cooked, take them out of the oven. Let them cool for a few minutes. 2. Cut each potato in half lengthwise. Be careful; they will be hot! 3. Scoop out some of the potato flesh with a spoon. Place this in a separate bowl. Don’t scoop out too much; leave some for structure. 4. Mash the scooped-out potato flesh with a fork until it’s smooth. 5. Add this mashed potato back to the broccoli and cheese mixture. Stir until everything is combined. 6. Spoon the broccoli-cheese filling back into the potato skins. Heap it on top for a nice look. 7. Return the filled potatoes to the oven. Bake for an additional 15 minutes. The tops should be golden and the cheese melted. 8. Take them out of the oven and let them cool slightly. Garnish with chopped green onions before serving. For the complete details, check the Full Recipe. Enjoy your delicious Broccoli Cheddar Stuffed Potatoes! To know when your potatoes are done, pierce them with a fork. If it slides in easily, they’re ready. For best results, bake large russet potatoes for 45-60 minutes at 425°F (220°C). When you scoop out the flesh, leave some inside the skins. This helps the potato hold its shape. It also keeps the skins from getting too crispy. A little potato left adds flavor and texture to your filling. To boost flavor, consider adding spices like garlic powder or onion powder. A sprinkle of paprika gives a nice touch. You can also mix in some herbs, like thyme or chives, for a fresh taste. For a creamy filling, use both cream cheese and sour cream. This combo creates a rich texture. Mixing in some melted butter also adds a lovely smoothness to the filling. Serve your stuffed potatoes on a colorful plate. This makes the dish look inviting. You can drizzle a bit of sour cream on the side. It adds extra creaminess and looks nice too. Garnish with chopped green onions for a pop of color. They add a fresh crunch that pairs well with the soft filling. For an extra touch, you can even sprinkle some cheese on top before serving. Enjoy these tips to make your broccoli cheddar stuffed potatoes not just tasty, but a feast for the eyes! Don't forget to check out the Full Recipe for complete instructions. {{image_2}} If you want a vegan version, swap dairy ingredients for plant-based options. Use vegan cheese instead of cheddar. Replace cream cheese and sour cream with cashew cream or tofu. These changes keep the flavor while making it dairy-free. For gluten-free needs, ensure you pick gluten-free cheese. Most cheeses are safe, but always check labels. You can also serve the filling in a bowl without the potato skin. This way, you enjoy all the flavors without gluten. Adding protein can make this dish heartier. Try cooked chicken or crispy bacon for extra flavor. Chop them up and mix them into the filling. This will add a tasty twist and make it more filling. You can also change up the veggies! Spinach and bell peppers work well. Chop them finely and add them to the broccoli mix. This adds color and nutrition to the dish, making it even better. Want to save time? You can use an air fryer. Just set it to 375°F (190°C) and cook the potatoes for about 30 minutes. This method gives you a crispy skin and soft inside. For a hands-off approach, try a slow cooker. Place the potatoes in the cooker, add a bit of water, and cook on low for 6-8 hours. This way, they cook while you do other things. Just be sure to check for doneness before serving. For the full recipe, check out the details above. To store your leftover broccoli cheddar stuffed potatoes, place them in an airtight container. This keeps them fresh and tasty in the fridge. Make sure to cool them down before sealing the container. They can stay in the fridge for about 3 to 5 days. If you want to save some for later, freezing is a great option. Wrap each stuffed potato tightly in plastic wrap, then place them in a freezer bag. This method helps prevent freezer burn. You can freeze them for up to 3 months. When it's time to heat up your stuffed potatoes, the best method is to use the oven. Preheat your oven to 350°F (175°C). Place the potatoes on a baking sheet and cover them with foil. This keeps moisture in and prevents drying out. Heat for about 20-25 minutes or until they are hot all the way through. You can also use a microwave if you're in a hurry. Simply place a potato on a microwave-safe plate and cover it with a damp paper towel. Heat for 2-3 minutes, checking often to avoid overcooking. These stuffed potatoes can last in the fridge for about 3 to 5 days. If you freeze them, they can last for 3 months. Look for signs of spoilage, like a sour smell or mold, before eating. If they don't smell right, it's best to toss them. Enjoying your delicious broccoli cheddar stuffed potatoes fresh is always the best way! For the complete recipe, see the [Full Recipe]. Baking the potatoes takes about 45 to 60 minutes. Start by preheating your oven to 425°F (220°C). Scrub the potatoes well and pierce them several times with a fork. This step helps steam escape while they bake. Place the potatoes on a baking sheet and let them bake until they feel soft when you poke them with a fork. The exact time can depend on the size of your potatoes. Larger ones might take a bit longer. Yes, you can prepare these stuffed potatoes ahead of time. Bake the potatoes and prepare the filling. Store the potato skins and filling separately in the fridge. When you are ready to eat, simply fill the skins and bake them. This method saves you time on busy days. You can even prepare everything a day before. Just reheat the filling if it has cooled down too much. Stuffed potatoes pair well with many side dishes. A simple green salad adds freshness and crunch. You can also serve them with roasted vegetables for extra flavor. If you want protein, grilled chicken or a side of beans works well too. For a heartier meal, consider adding a warm soup. Tomato soup or a creamy broccoli soup complements the stuffed potatoes nicely. Absolutely, you can make these potatoes vegetarian. Use plant-based cream cheese and sour cream for the filling. You can also swap the cheddar cheese for a dairy-free alternative. This way, you keep the creamy texture and rich flavor. Ensure all your ingredients are labeled vegetarian. This dish remains delicious and satisfying without meat. This blog post detailed how to make tasty stuffed potatoes. We covered the key ingredients, preparation steps, and helpful tips. You learned ways to enhance flavor and explore easy variations. Stuffed potatoes are versatile, healthy, and fun to make. You can enjoy them as a side dish or a main meal. With these ideas, you can create your own unique version. Enjoy cooking and sharing this delicious dish!](https://dailydishlab.com/wp-content/uploads/2025/06/cd67da25-e7a2-45e2-aa83-3a832e7f2c3d-768x768.webp)